Wednesday, June 26, 2013

project life : week 25.

It's week twenty-five and I love this project.
 click the photo to enlarge for a somewhat clearer image.

Week of : June 17 - June 23.
 What happened this week?  McKenzie had a friend over.  Family tending to a sick guinea pig.  Callie started speech therapy.  Put up the garden fencing.
 Techniques this week:  Kept this week super simple which is what I really love about this album.  The stamp "this is love" is from Elise Blaha Cripe's stamp shop.
 I also added text in Photoshop to the top two photos.  I am still a huge fan of adding text directly onto photos.  This technique really works for me when I want to tell a story.
 The stamp "let love grow" is also from Elise Blaha Cripe's stamp shop.
Project Life is a memory-keeping system created by Becky Higgins.  I use photos, text and stuff to document our life weekly.  I am currently using the Seafoam core kit created by Elise Blaha Cripe.

Sunday, June 23, 2013

project life : week 24

It's week twenty-four and I love this project.
 click the photo to enlarge for a somewhat clearer image.

Week of : June 10 - June 16.
 What happened this week?  The girls really love watering the garden.  Matt's been working in his pumpkin patch.  McKenzie's report card came in the mail.  She was a Straight "A" student all year.  Super proud Mom and Dad.  Trip to Ashland Hospital for some lab work & Father's Day.
 Techniques this week :  I ordered some stamps from Studio Calico.  Made this 3x4 card and added some digital stitching and journaling around the sides.  I used a colored sharpie marker for the leaves.
 That "today is" stamp is from Elise Blaha Cripe's stamp shop.
 Cut down some cardstock and rounded the top corners.  Added some journaling and a date stamp.  I also added some letter stickers at the bottom.
Added some letter stickers to this photo.

Project Life is a memory-keeping system created by Becky Higgins.  I use photos, text and stuff to document our life weekly.

Thursday, June 20, 2013

project life : week 23

It's week twenty-three and I love this project.
click the photo to enlarge for a somewhat clearer image.

Week of : June 3 - June 9.
What happened this week?  Last week of school.  Field Day at Bellview.  Matt's half sister was here for a visit.  (If you are reading this Kelly Rae... we miss you).
Anything special in the spread?  I used a Project Life Design I Photo Pocket Page.
The "you are so loved" stamp is from Elise Blaha Cripe's stamp shop.
The "love you forever" stamp is also from Elise Blaha Cripe's stamp shop.
I used an 8 1/2 x 11 page protector.  You can find these at most office supply stores.
I loved this letter Callie brought home from school.
I use the Seafoam edition of Project Life.  The photo of  Matt and his sister was cropped in Photoshop to 3X4 and then attached to a 4x6 project life (Seafoam Edition) card with staples.  The stamped arrow with the heart is from Studio Calico.


Included an awesome fortune from a Chinese restaurant.  Love the flexibility of this project and how it allows me to add treasured keepsakes here and there.
Project Life is a memory-keeping system created by Becky Higgins.  I use photos, text and stuff to document our life weekly.

Wednesday, June 19, 2013

project life : week 22

 It's week twenty-two and I love this project.
 click the photo to enlarge for a somewhat clearer image.

Week of : May 27 - June 2.
 What happened this week?  Memorial Day.  Working in our garden.  Field trip with my Callie's 2nd grade class.
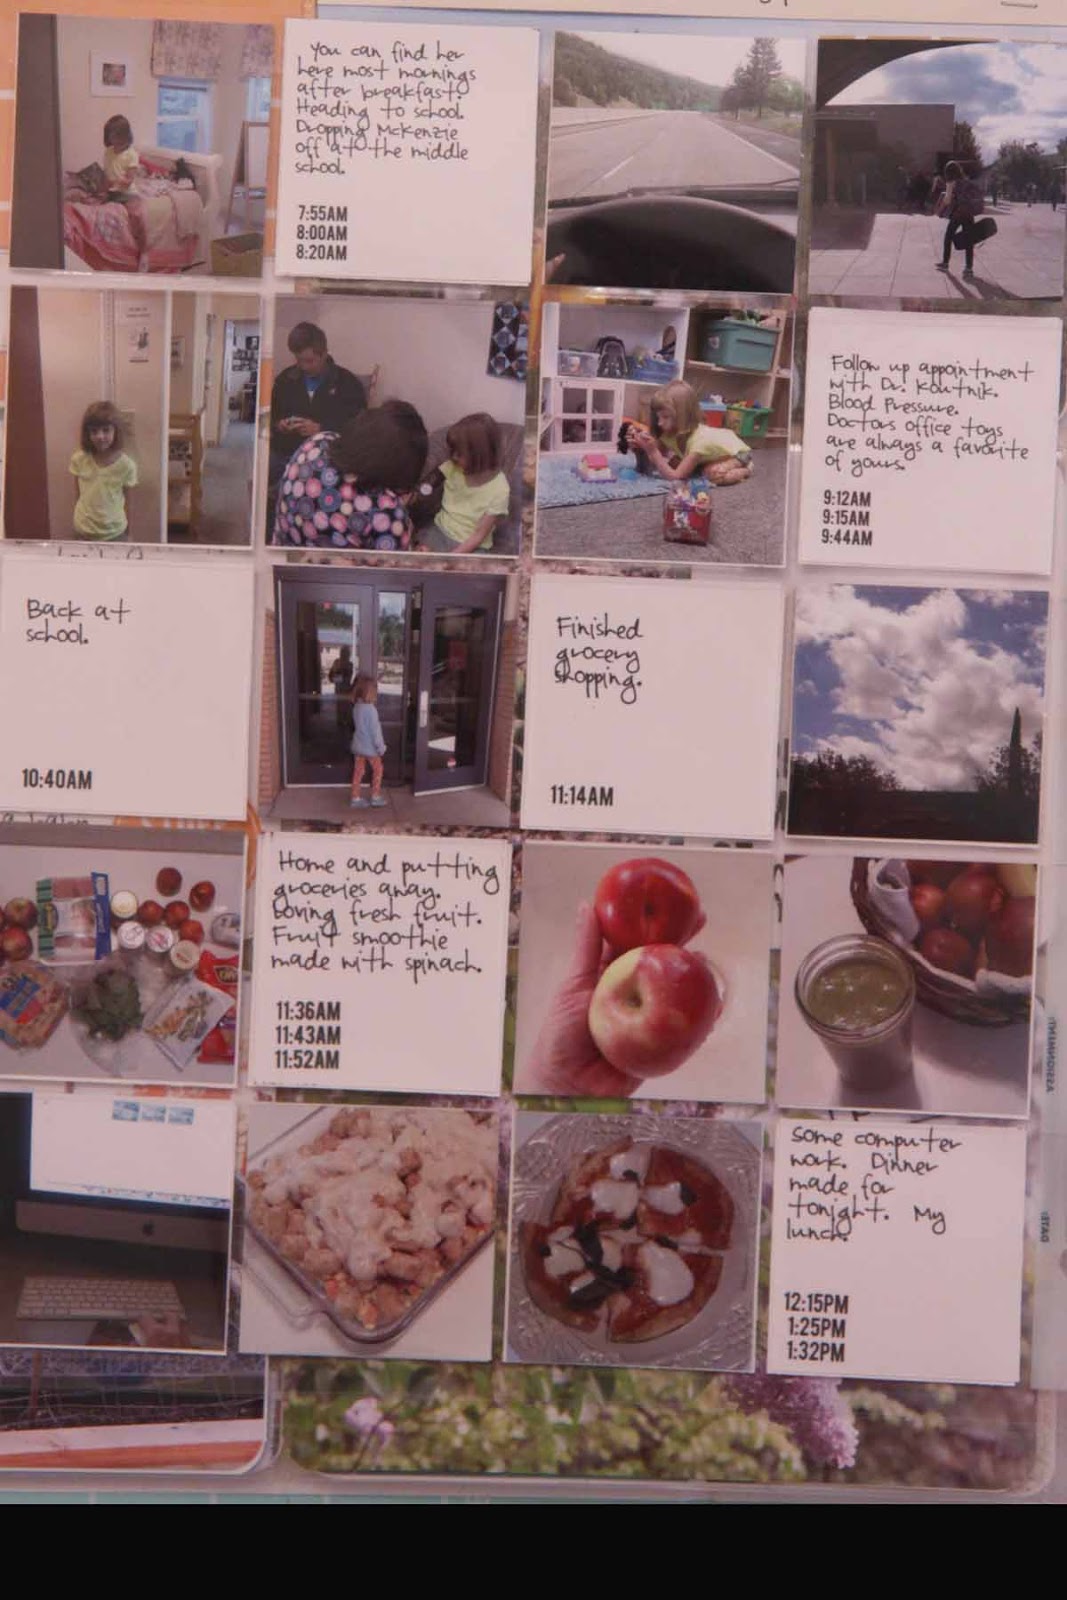
 Anything special in the spread?  I completed another "day-in-the-life" challenge that took place on May 28th.
 Techniques this week :  Cutting a piece of card stock and adding text and a date stamp and then stapling it onto the photo.
 I also love adding text onto photos in Photoshop Elements.
 The "Hello" stamp is from Elise Blaha Cripe's stamp shop.  (the box is empty so you can add whatever word you want.  In this shot, I added the word "blooms.")
Going to continue adding a favorite quote the duration of this year.  Will probably do something different in 2014.
 Documenting a "day-in-the-life" challenge is super fun.  Will most likely do this again at the end of July.  I use a these pocket pages that are meant to hold slides.  You can find them at most camera supply stores too.  The "hey y'all" flair badge is something I picked up at Michael's a while ago.  If you like adding flair badges, I love using these from Evalicious.  I just placed another order yesterday.


 I took a bunch of shots and didn't want to leave a single one out, so it took two of these pocket pages using both sides.  Lots of cutting/trimming but so totally worth the effort.
 If anyone want's more information regarding "day-in-the-life," check out Ali Edward's blog.  She's super cool.
 All these photos were cropped and edited to 2x2 in Photoshop Elements.
Here is the right side of this weeks spread.  The "right now" card is part of the Midnight Edition.  I downloaded this version.
 I took the girls to see the movie "Epic" on Monday.  Saved the tickets and then stapled them onto a card.
 That "love you forever" stamp is also from Elise Blaha Cripe's stamp shop.
 I'm still a fan of adding text around a card.  Super simple and fun.

 Sometimes instead of adding more papers and stuff into my album, I'll take a photo of it.  Less bulky and still tells the story I want to remember.
Project Life is a memory-keeping system created by Becky Higgings.  I use photos, text and stuff to document our life weekly.

Wednesday, June 5, 2013

making home made granola.


I made home made granola for the first time today.  Here's the simple recipe I followed:

What you will need:

1.  1 cup of pecans

2.  1 cup of hazelnuts

3.  1 cup of raw almonds

4.  1/4 cup flax seeds

5.  1 cup of coconut oil (measure it out while it is in solid form not melted)

6.  2 tbs of honey

7.  1/2 tsp of salt

8.  1 tbs of cacao powder

9.  1 tsp vanilla

10.  1 tsp of cinnamon

11.  1/2 cup of unsweetened shredded coconut

*You can use other nuts if you would like.  Each nut will give your granola a little different consistency and taste.


Directions:

1.  Preheat oven to 300 degrees.

2.    Place all your nuts in a food processor and pulse a few times until you have a granola like consistency.  If you over process, you will end up with nut flour or nut butter.  So keep an eye on it.

3.  In a small pot melt and mix together the coconut oil, honey, vanilla, cacao powder, salt and cinnamon.  Stir in the shredded coconut.

4.  Add the mixed nuts to the melted mixture and coat your "granola" really well.

5.  Place granola on a parchment lined baking sheet and bake for 10 minutes.

6.  Let cool and eat just like you would eat any other granola.  Keep granola in an airtight container in your fridge.

Note:  If you need this ASAP, you can make it completely raw and not put the nuts in the oven.  I've heard it's just as good but the baked version just has a little more of a deeper roasted taste.